-
Custom White Balance (huh?)
Posted on June 15th, 2009 No commentsLet’s continue our discussion of some basic photography concepts. Since the miniatures hobby is so visual, and since my website is so image heavy, I figure it’s somewhat pertinent.
You’ve all probably seen pictures on various websites and forums, where images have heavy yellow or orange tints. That, my friend, is usually the result of using incorrect white balance value.
What is white balance? Here’s the explanation from Wikipedia:
… color balance (sometimes gray balance, neutral balance, or white balance) refers to the adjustment of the relative amounts of red, green, and blue primary colors in an image such that neutral colors are reproduced correctly.
Let’s think this through. All sources of light have different color temperatures, measured in kelvin. I won’t go into the theoretical explanation of color temperatures, of which I myself only have a tenuous understanding. Suffice it to say that different types of light sources — the sun, a fluorescent light bulb, halogen light, tungsten light, etc. — all give off different color temperature. Our brain can “interpret” the different sources on the fly without us being aware of it and render the colors correctly regardless of the source. So a red ball has the same color whether we look at it in the sun or indoors or under a light bulb.
Cameras do not have such luxury, and thus they have to guess. This is where AWB — automatic white balance — comes in. The camera analyzes the ambient lighting and tries to render and capture the scene with correct neutral colors. For the most part, the camera — especially the newer ones — do pretty good. You can take a look at the first image in the post immediately preceding this one to see the difference of four years and two generations of image processing chips make.
Most cameras also come with preset white balances for the instances where you want to have finer control over it. For example, white fluorescent light gives off a color temperature of just under 5,000 kelvins. When you set the camera’s white balance to fluorescent, then the camera will capture the image assuming that the available light is at right around 5,000 kelvins. If you accidentally choose the wrong white balance setting relative to the actual lighting condition (for example, you set fluorescent white balance for shooting outdoors in the sun), then the resulting images will have a color tint that’s very off. Please keep in mind that this is a vastly simplified explanation.
If you have a tricky lighting situation — such as multiple, disparate types of lights illuminating the scene to be captured — then this is where custom white balance comes in. Most digital cameras will have custom white balance option, where a user-supplied information can be saved as a white balance setting. Very basically, this is how it works. You use a white piece of paper or cloth and tell the camera, “this is white.” When the camera analyzes the scene, it notes the light reflecting off the white paper (or cloth) and notes the color temperature. But then it knows that despite the color temperature, this is supposed to be neutral white. So it applies a conversion factor to render the scene in neutral white, and stores that conversion factor and apply it to the future pictures. Obviously, this process needs to be re-run every time the light sources change.
The actual process of setting custom white balance differ from camera to camera and from brand to brand. With my Canon Digital Rebel SLR, you put the lens in manual focus and put a white piece of paper in the middle of the view. Take a picture (if not in manual focus, then the camera would try to focus and cameras really can’t focus on a piece of white paper — there’s no contrast for it to lock on and focus on). Then you drill down to the menu and tell the camera to use custom white balance based on this image.
Check out these images that illustrate my very wordy explanation hitherto!
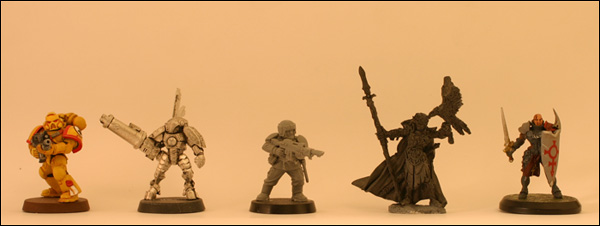
The first picture shows the scene in automatic white balance (AWB). The camera’s confused — I used a mix of incandescent and daylight light bulbs to illuminate the scene.

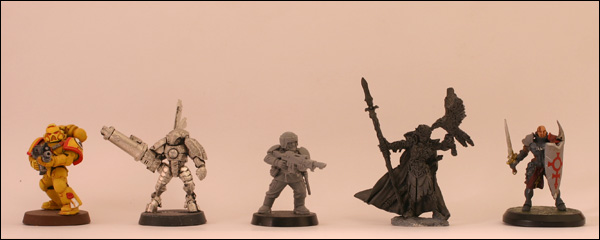
I switched the white balance mode to tungsten. A little bit better, but the image has a decidedly pink tint:

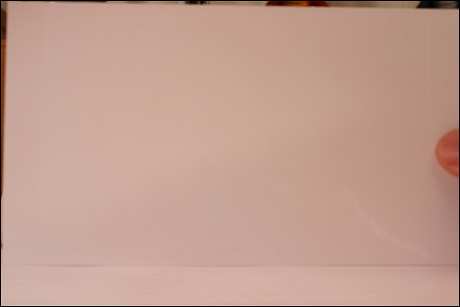
So I took a picture of a white piece of paper (notice my thumb on the right holding the paper), and told the Digital Rebel to use this as my custom white balance setting.

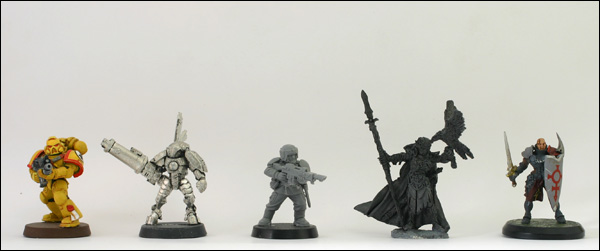
Voilà! The white background is properly renderd, and from here I can now go on to make further image adjustments.

I hope you found this little article helpful to further better your own miniatures photography!
Originallly written for WeeToysSoldiers on Saturday, February 16, 2008 at 11:15 pm by Hyun
We started talking to Hyun and he’s not sure what’s happening with his site at the moment. I, personally, hate to see good content disappear so we’re slowly going to republish (with permission) his articles either here or on TerrainMonster (depending on the type of article).
1 Trackbacks / Pingbacks
-
[…] Interestingly each of the above pictures shows the figure correctly, the only thing that has been altered is the ‘virtual’ lighting conditions. The only set up I did on the camera was to specify a custom White Balance which is a very simple operation to do. Trying the Auto Colour option in Picasa didn’t chage the picture which shows that the camera had the correct ‘warmth’ in the setTings. For more on White Balance have a look here. […]
-


Photographing Miniatures 2 | Little Soldier Company June 16th, 2011 at 03:44